Tuesday, June 22, 2021

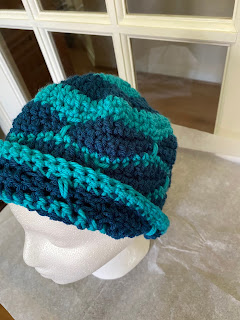
Crystal Wave Hat


Crystal Wave Hat


Please note:  I make all my hat patterns free of charge to inspire crocheters to make hats for charity, particularly for Hat Not Hate.  Please feel free to redistribute this pattern, so long as you include this note and credit the pattern creator. Please visit my Ravelry store and consider purchasing a pattern that is not free.

The hat's inspiration comes from a tutorial that Crystal/Bag-O-Day Crochet posted for a new cowl pattern, featuring some amazing yarn from The Paw Ply Yarn Co..  I thought the stitch sequence would make a great hat, and based on an informal survey of yarnies, I decided on the name Crystal Wave Hat, to honor Crystal.

Yarn:  Any solid-color worsted weight yarn, such as Lion Brand Pound of Love.  Would also work with a DK weight yarn.   Approximately 105 yards/95 m.  Approximately 70 yards/64 m. of a primary color, 35 yards/32 m. of a highlight color.  Your mileage may vary.

Hook:  5.5 mm/I

Stitches:  Chain (ch), single crochet (SC), half-double crochet (HDC), double crochet (DC), slip stitch (SS) [SSTJ = slip stitch to join]

The best way to adjust size is to alter the hook size and/or yarn weight, because this pattern works best if the number of stitches in each round of the body is a multiple of 10 (5 rows x 12 st = 60)


Method:

Create initial disc:
  1. Using highlight color, ch 4, slip stitch to join (SSTJ) into a ring;  Ch 3 (counts as DC here and throughout), work 11 more DCs in the ring.  SSTJ in top of ch 3. (12 DC total, including ch 3). 
  2. Ch 3, DC in same stitch, 2 DC in each DC from previous round.  SSTJ in top of ch 3. (24 DC total) Change color for the next round.
  3. Using the primary color, ch 3, 2 DC in next st, [DC in next st, 2 DC in next st] repeat bracketed instructions to end of round.  SSTJ in top of ch 3.  (36 DC total)
  4. Ch 3, DC in next st, 2 DC in next st, [DC in next 2 st, 2 DC in next st] repeat bracketed instructions to end of round.  SSTJ in top of ch 3.  (48 DC total) Change color for the next round.
  5. Using highlight color, ch 3, DC in next 2 st, 2 DC in next st, [DC in next 3 st, 2 DC in next st] repeat bracketed instructions to end of round.  SSTJ in top of ch 3.   (60 DC total)
Please note, if you would like more information about how to crochet in the round like this, see my video tutorial here.


Body of hat:

  1. Staying with the highlight color, ch 1; SC in the st where you joined in the last round, and in every st of the round.  SSTJ in the 1st SC. When working a round of SC I find it useful to place a stitch marker in the 1st SC to make clear exactly where to join at the end and avoid confusion with the ch1.  (60 st in this and every subsequent round.)  Change to primary color.

    First section:
  2. Using primary color, ch1; SC in the st where you joined in the last round, HDC in next st, DC in next 5 st, HDC in next st, SC in next st, ch1, skip 1; [SC in the next st, HDC in next st, DC in next 5 st, HDC in next st, SC in next st, ch1, skip 1]  work bracketed instructions 5 times, SSTJ in the 1st SC.
  3. Repeat round 2. Change to highlight color
  4. Using highlight color, ch 1; SC in the st where you joined in the last round and in the next 8 stitches. If you are not in a position to make your next stitch into the ch1 spaces below, recheck your counting.  DC into the ch1 space 2 rows below. [SC in next 9 stitches, DC in ch 1 space 2 rows below.] Work bracketed instructions 5 times, SSTJ in 1st SC.  Change to primary color.

    Offset section:
  5. Using primary color, ch 3 (counts as DC), DC in next 2 st, HDC in next st, SC in next st, ch 1, sk 1.  For the offset to appear correct, the ch1 space must be aligned to the 3rd DC of the primary color section below. If not, recheck your counting. [SC in next st, HDC in next st, DC in next 5 st, HDC in next st, SC in next st, ch 1, sk 1] work bracketed instructions 4 times, ensuring alignment each time; SC in next st, HDC in next st, DC in next 2 st, SSTJ in top of ch3.
  6. Repeat round 5.  Change to highlight color.
  7. Using highlight color, ch 1; SC in the st where you joined in the last round and in the next 4 st.  If you are not in a position to make your next stitch into the ch1 spaces below, recheck your counting.  DC into the ch1 space 2 rows below. [SC in next 9 stitches, DC in ch 1 space 2 rows below.] Work bracketed instructions 5 times; SC in next 5 st, SSTJ in 1st SC.  Change to primary color.

  8. R 8,9,10:  repeat R 2,3,4
  9. Optional R 11,12,13:  repeat R 5,6,7
  10. Add a row of SC in either color.  

For the body of the hat, proper arrangement of the offset sections is crucial for the hat to look its best.  This is where counting is essential.  For each offset section to appear correctly, the 3rd DC of 5 must be directly above the border DC and ch spaces from previous rows, and the ch spaces and border DC must be directly above the 3rd DC of 5 in the previous rows.  
    Optional:  If you include the additional rounds in step 9, your hat might be long enough to look like a flapper hat.  Consider adding a crocheted flower or leaf in the highlight color as an ornament.

    Sew in loose ends.  Bribe someone to model it for Instagram pictures.  

    Please address any questions or comments to beardedyarndudes@deb8.biz.

    Sunday, June 6, 2021

    Another hat pattern!

     Alicia Stitch Hat

    This hat is an excellent accompaniment to my Alicia Shawl pattern, which at my Ravelry store here.

    Please note:  I make all my hat patterns free of charge to inspire crocheters to make hats for charity, particularly for Hat Not Hate.  Please feel free to redistribute this pattern, so long as you include this note and credit the pattern creator.

    All my links: https://linktr.ee/BeardedYarnDudes

    An earlier iteration.  
    Yarn:  Any solid or variegated DK or worsted weight yarn. I am quite fond of Lion Brand Jeans for this hat (see pics), but many others would work. I hesitate to recommend a self-striping yarn, unless the stripe is shorter than those found in Lion Brand Mandala, for example.  (Although I am exceedingly fond of Lion Brand Mandala for other patterns.)

    Hook:  5.0 (H) or 5.5 (I), or other hook to suit the yarn.


    Stitches:  

    • chain (ch) 
    • single crochet (SC)
    • back-loop single crochet (SC working in the back loop of the stitch rather than both loops)
    • half-double crochet (HDC)
    • double crochet (DC)
    • front-post double crochet (DC working around the post to push it forward, rather than the top of the stitch)
    • back-post double crochet (DC working around the post to push it back, rather than the top of the stitch)
    • slip stitch (SS)
    • chain 1 space (ch 1 sp)


    Hat top:

    Ch 4, slip stitch to join (SSTJ) with first ch, creating a ring; alternately use the magic ring

    1. ch 4 (counts as DC + ch), DC in the ring, ch1, [DC in the ring, ch1] repeat until there are 6 DCs and 6 ch 1 spaces, SSTJ in the 3rd ch of the ch 4 that began the round (6 DC + 6 ch 1 sp) 

    2. ch 4 (counts as DC + ch), DC in the ch where the SS from previous round is located, [ch1, DC in next ch 1 space, ch 1, DC in next DC] repeat until the last DC has been worked, ch 1 + DC in last ch 1 space, ch 1, SSTJ in 3rd ch of the ch 4 that began the round (12 DC + 12 ch 1 sp)

    3. ch 3 (counts as DC), 2 DC in next ch 1 sp, [DC in next DC, 2 DC in next ch 1 sp] repeat to the end of the round, SSTJ in top of ch 3 that began the round (36 DC)

    4. ch 3 (counts as DC), DC in next DC, 2 DC in next DC, [DC in next DC, DC in next DC, 2 DC in next DC] repeat to the end of the round, SSTJ in top of ch 3 that began the round (48 DC)

    5. ch 3 (counts as DC), DC in next 2 DCs, 2 DC in next DC, [DC in next 3 DCs, 2 DC in next DC] repeat to the end of the round, SSTJ in top of ch 3 that began the round (60 DC)

    6. ch 4 (counts as DC + ch 1), skip 1, DC in next DC, ch 1, skip 1, DC, ch 1, [DC in next DC, ch 1, skip 1, DC in next DC, ch 1, skip 1, DC, ch 1] repeat to end of round, SSTJ in 3rd ch of ch 4 that began the round (36 DC + 36 ch 1 sp)

    Measure your hat top after round 5. If the diameter is 7.5 in (19 (cm) the hat brim will measure 22-23 in (56-58 cm). If you omit round 6—or indeed, 5 and 6--it will have no negative effect on the final hat.

    Side of hat: 

    (each round has the same number of stitches as the last round of the top)

    1. Ch 4 (counts as DC + ch1), skip 1*,  [DC in next DC, ch 1, skip 1] repeat to end of round, SSTJ in 3rd ch of the ch 4 that began the round. Optional: omit this round, or work R 2 and then R 1.   *If previous round is all DC, skip 1 DC; if previous round alternates DC and 1 ch 1 sp, skip the ch 1 sp.
    2. Ch 3 (counts as DC), DC in every ch 1 sp and DC of previous round, SSTJ at top of ch 3 that began the round
    3. Ch 3 (counts as DC), DC in every DC of previous round, SSTJ at top of ch 3 that began the round 
    4. Ch 1, HDC in the same st where you worked a SSTJ, HDC in all remaining DC from previous round, SSTJ
    5. Ch 1, SC in the same st where you worked a SSTJ, BLSC in all remaining HDC from previous round, SSTJ
    6. Repeat R 1, working with SC from previous round
    7. Repeat R 2, work SSTJ behind the ch 3 that began the round, not in the top ch
    8. Ch 3 (counts as FPDC), BPDC in next DC, [FPDC in next DC, BPDC in next DC] repeat to end of round.  If more height is required, repeat this round.  SSTJ in top of ch 3 that began this round. If less height is required, omit this round entirely and consider working round 9 twice.
    9. Ch 1, SC in ch where you worked SSTJ in previous round, and in all remaining stitches from the previous round.  Tie off

    Sew in loose ends.  Bribe someone to model it for Instagram pictures.  

    Please address any questions or comments to beardedyarndudes@deb8.biz.


    Tuesday, June 1, 2021

    Support your favorite content creators

    I am semi-retired. That means the thought that I could get another corporate job like I had before is ludicrous (plus it also makes me want to die), and I couldn't physically do the kind of lower-level jobs I now qualify for. I am waiting to hear about a Disability claim, but not holding my breath. In the meantime, crochet and social media are both an avocation and an occupation that has potential to bring income. It is one of several activities that have potential to bring in income. Toward that end, I would like to make the following points known.

    If you are reading my blog, I assume there is a level of good will concerning my activities and efforts. Based on an excellent live stream video from J.Hook Crochet, a fellow YouTube content creator whom I highly recommend, I have the following suggestions:

    • If you like a post in this blog or any of my blogs, comment at the blog, not the Facebook post where I linked the blog.
    • If you like a post in this blog or any of my blogs, share it. I don't have Pinterest or TikTok, but I certainly don't object if those who do have them link me or talk about me there. If a particular post moves you, talk about it freely everywhere. 
    • If you have a way to follow this blog or any social media outlet where I have presence, then subscribe and designate notifications for all new posts.
    • In blogs, on YouTube, on Instagram--comments are gold. Since Google controls the whole world, and knows the connection between my three blogs, my two Instagram pages, my two Facebook business pages (plus a dormant one I'm considering resurrecting), and my individual Facebook ID, what I had for breakfast, and what I might have for dinner two weeks hence, commenting to one helps all.
    • I know YouTube is already playing ads on my videos, even though I don't yet qualify to receive any  benefit from them. Regardless, if you play the ad through, eventually I as content creator will benefit and the evil advertiser will pay more. Always remember that:  if you play the ad all the way through, the evil advertiser pays more. And remember that on TV we would always use commercials as time for a bio-break or to refill a beverage. (For the record, the advertisements you see are based on your browsing history and interests, and I have absolutely no control over them.)
    • All comments are welcome. On the other hand, if you wish to bring to my attention a technical issue with my A/V setup, usually the issue will not have escaped my notice. I am learning a lot of new things in this content creator journey. But do comment. I promise not to post a snarky reply. Well, I'll try to resist.....
    • The media outlets evaluate how much time people spend with your videos. That is why content creators are always asking you to watch to the end. I ask you to do the same. Am I so annoying that you don't have a few more minutes to help me out?
    • Please. Watch freely. Enjoy all the content creators you enjoy. Whatever you can fit into your life--and I know some people have more time for social media than others. But watch freely. It doesn't even matter if you're paying attention! (But don't tell our Google Overlords that I said that! I will deny it to my dying byte! Or not.)
    • If you follow a content creator who sells stuff, consider buying stuff. Some yarn content creators sell finished objects. I sell patterns and merch. If you're struggling to feed your family don't buy my stuff, or anyone else's. If you have a few extra shekels, give it some thought. 

    Just a few thoughts. I welcome your opinions.

    The video I reference: